

[Adjustment]
Overview
Edit [CMYK-CMYK Device Link Profile].
You can execute [Point Color Adjustment] and [Profile Curve Adjustment] for each object*.
Clicking [Adjustment] displays the wizard. Follow the on-screen instructions to edit [CMYK-CMYK Device Link Profile].
- CMYK: Image, Graphics, Text
The workflow in the wizard is as follows.
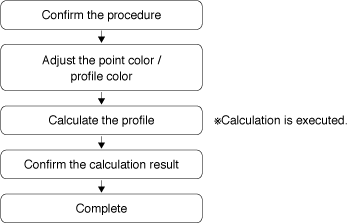
- The Image Controller is required to use this function. For details, refer to What Is Color Centro?.
Specifications
Category | Print Workflow, Adjustment / Maintenance | ||
Location | Machine | - | |
Printer driver | - | ||
Application | Color Centro | ||
Required options | - | ||
Required items | - | ||
Setting items | [Adjustment] | Edits [CMYK-CMYK Device Link Profile]. | |
Remarks | - | ||
Reference | - | ||
Screen access | Color Centro - [Profile Management] - [CMYK-CMYK Device Link Profile] - Select a folder. - [Adjustment] | ||
Color Centro - [Profile Management] - [CMYK-CMYK Device Link Profile] - Select a folder. - [File] - [Adjustment ...] | |||
Procedure (Starting the [Adjustment] Screen)
You can also click [Profile Type] - [CMYK-CMYK Device Link Profile] from the menu list of [File] to perform the same operation.
[CMYK-CMYK Device Link Profile] of the folder selected in the profile display field are displayed in a list.
You can change a connection to another Image Controller. For details, refer to [Printer(P)].
To update the contents of the profile display field to the latest information, click [Reload] from [File]. For details, refer to [Reload].
The [Confirmation of procedure] screen is displayed.

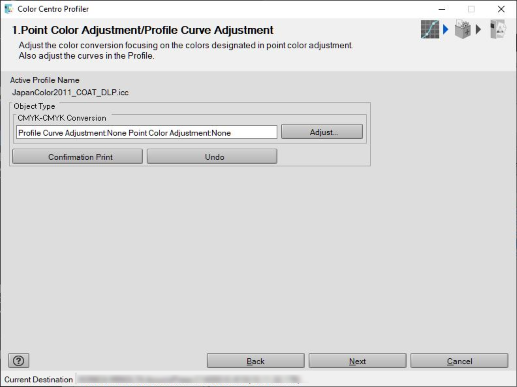
The [Point Color Adjustment/Profile Curve Adjustment] screen is displayed.
Proceed to Procedure (Adjusting the Point Color).

Procedure (Adjusting the Point Color)
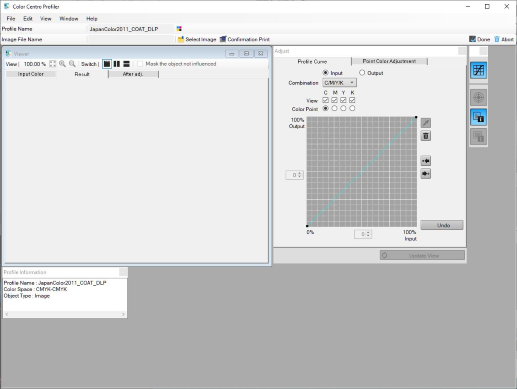
The [Adjustment] screen is displayed.

A job stored by selecting [Hold Jobs without RIP] is not displayed.
To add a new point color, proceed to step 3.
To edit the specified point color, proceed to step 7.
To delete the specified point color, proceed to step 10.
To execute [Confirmation Print] after adjustment, proceed to step 12.
In [Point Color Adjustment], the result value may be lower than the setting value. This is because the input/output curve is adjusted. A curve is created, balancing with other adjustment points.
The layout of the [Adjustment] screen is as follows.
Item | Description | |
|---|---|---|
Toolbar | [Select Image] | Select the image to adjust. The selected image is displayed in [Viewer]. |
[Confirmation Print] | Prints the image to which the adjusted contents are applied. You can check the adjustment result. | |
[Done] | Ends adjustment. | |
[Abort] | Discards the adjustment result, and closes [Viewer]. | |
[Viewer] | [Input Color] | Displays the original image that is not yet adjusted. |
[Result] | Displays the image, which is processed by DLP (Digital Light Processing) before adjustment, for [Input Color]. | |
[After adj.] | Displays the DLP-processed image, to which the adjustment details are applied, for [Input Color]. | |
[Adjustment] | Executes [Point Color Adjustment/Profile Curve Adjustment]. To make individual adjustments, switch the [Profile Curve] and [Point Color Adjustment] tabs. | |
[Undo] | Discards all the [Add.Value] settings, and returns to the status before adjustment. | |

 " on the [Point Color Adjustment] screen.
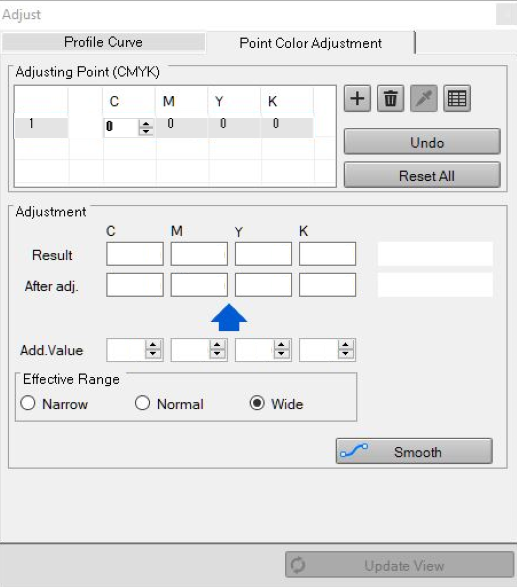
The line for which the line number is attached to [Adjusting Point (CMYK)] is added.

The new input colors are displayed in [Pointed Color].
You can also click " " and left-click the image on [Viewer] to set the point color value.
Clicking "
The color conversion result is displayed in [Result] and [After adj.] of the [Adjustment] field. The color of [Result] is displayed in the upper stage of the sample color display field on the right of [Result], and the color of [After adj.] is displayed in the lower stage.
[Narrow]: The adjustment result affects only the colors closer to the input color.
[Normal]: The adjustment result affects colors between [Narrow] and [Wide].
[Wide]: The adjustment result also affects the colors away from the input color.
[Effective Range] can be set for each point color.
The values displayed in [Result] and [After adj.] of the [Adjustment] field are obtained by applying the input curve and color conversion table (value obtained before the output curve is applied).
To discard all the [Add.Value] settings, click [Undo].
The input color is displayed in the lower stage of the sample color display field on the right of [Result].
The color conversion result is displayed in [Result] and [After adj.] of the [Adjustment] field. The color of [Result] is displayed in the upper stage of the sample color display field on the right of [Result], and the color of [After adj.] is displayed in the lower stage.
[Narrow]: The adjustment result affects only the colors closer to the input color.
[Normal]: The adjustment result affects colors between [Narrow] and [Wide].
[Wide]: The adjustment result also affects the colors away from the input color.
[Effective Range] can be set for each point color.
The values displayed in [Result] and [After adj.] of the [Adjustment] field are obtained by applying the input curve and color conversion table (value obtained before the output curve is applied).
To discard all the [Add.Value] settings, click [Undo].
The selected point color is deleted.
The [Confirmation Print] screen is displayed.
To perform [Profile Curve Adjustment] before [Confirmation Print], refer to Procedure (Adjusting a Profile Curve).
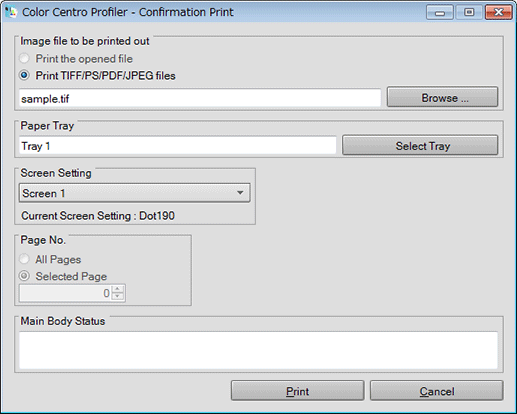
Click [Browse ...] to display the screen, and select the image file to print.
Click [Select Tray] to display the screen, and select the target tray in [Confirmation Print].
Select the screen used in [Confirmation Print] from the menu list of [Screen Setting].
Select [Page No.].
Clicking [Cancel] closes the [Confirmation Print] screen.

The [Adjustment] screen closes, and the display returns to the [Point Color Adjustment/Profile Curve Adjustment] screen.
The profile calculation is executed, and a profile is created.
When calculation is completed, the [Complete adjusting CMYK-CMYK Device Link Profile] screen is displayed.
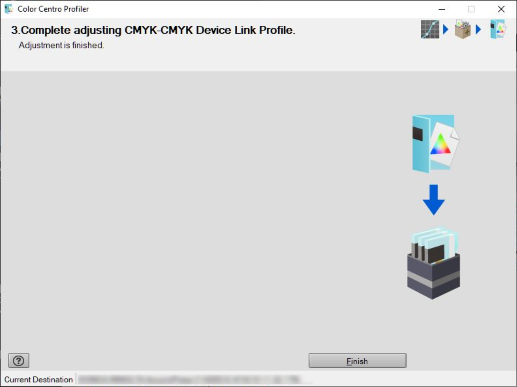
The wizard exits, and the display returns to the [Profile Management] screen.
To set a profile to the default, use [Color Default Settings]. A profile can be selected for each object type.

Procedure (Adjusting a Profile Curve)
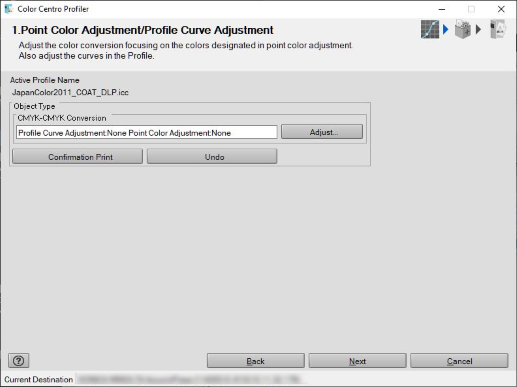
The [Adjustment] screen is displayed.

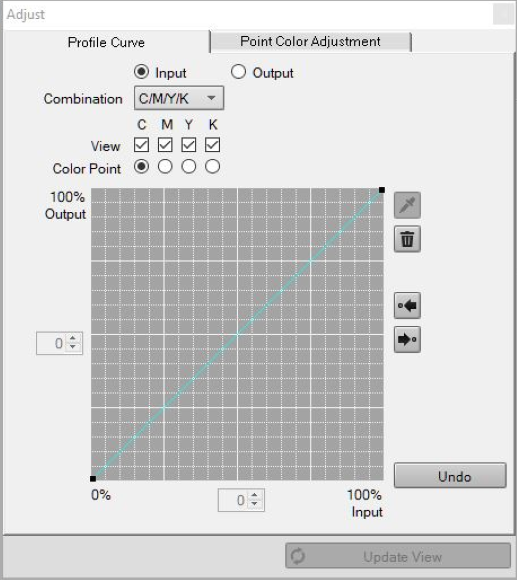
[Input]: Adjusts the input curve.
[Output]: Adjusts the output curve. In general use, select [Output].

The [View] check box and [Adjustment Curve] radio button for each color are displayed depending on the contents selected in [Combination].
With [Input] selected: Select [C/M/Y/K], [CMY/K], or [CMYK].
With [Output] selected: Select [C/M/Y/K], [CMY/K], or [CMYK].
With [C/M/Y/K] selected: Adjusts the profile curve for each color.
With [CMYK] selected: Adjusts the profile curve for which CMYK are integrated.
With [CMY/K] selected: Adjusts only the black and profile curve for which CMY are integrated.
For colors you do not want to adjust, clear the [View] check box.
If you select [Adjustment Curve] of the color for which the [View] check box is cleared, the [View] check box is selected automatically.
To add an adjustment point, click on the profile curve.
The selected adjustment point is indicated by a red square.
If you click " " or "
 " when multiple adjustment points are on the profile curve, their selection is switched before and after.
If you select an adjustment point and enter the coordinate value in the entry box between the vertical axis and horizontal axis, you can move the adjustment point position.
To delete the added adjustment point, follow the steps below.
- Drag the adjustment point, and move to the closest adjustment point.
- Drop the adjustment point outside the profile curve drawing area.
- Select the adjustment point to delete, and click " ".
".
To return the adjusted profile curve to the unadjusted one, click [Undo].

 in the upper-right of a page, it turns into
  and is registered as a bookmark.