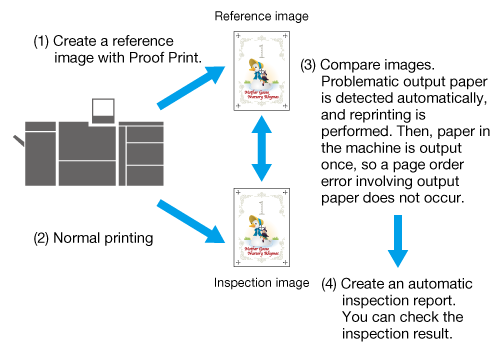

What Is Automatic Inspection?
Automatic inspection uses sensors to automatically detect spots and stains on images produced during printing, and then rejects output paper that has problems.
This function reduces labor costs associated with making manual inspections, while also helping to improve the efficiency of the printing process.

- The following options are required to use this function.
- Intelligent Quality Optimizer IQ-501
- Auto Inspection Unit UK-301
- Relay Unit RU-702
- Video Interface Kit VI-514
- Video Interface Kit VI-515
- The following option is required to use the real-time VDP collation function during printing.
- Variable Data Inspection Kit UK-312
- The following option is required to set the reference images used for automatic inspection to the RIP data.
- Inspection Enhancement Kit UK-311
- The paper sizes applicable for automatic detection are the same as the corresponding sizes for Intelligent Quality Optimizer IQ-501. However, the maximum applicable banner paper length is 487.8 mm/19.2".
- The displaying of inspection results for [Streak], [Spot], [Barcode Area], and [Serial No. (0-9) Area] is optional. These are not displayed under default settings. To use this setting, please contact your service representative.
Automatic Inspection Workflow
The following management and settings can also be configured for use in automatic inspection.
Management / Setting | Overview |
|---|---|
Reference image management | Use this to manage and delete registered reference images according to how often the images are used. For details, refer to Reference Images. |
Automatic inspection area settings | Set the areas that you do not want to be covered in the automatic inspection, or the areas you want to apply a special inspection such as when you want to modify a part of an image for printing, such as variable printing. By preventing unnecessary errors and automating the checks such as of sequential printing, more efficient inspections can be performed. For details, refer to Automatic Inspection Area. |
Settings for paper output trays for printed items on which an abnormality has been detected | Use this to configure paper output trays for printed items on which an abnormality has been detected according to the nature of the task. For details, refer to Output Settings. |
- For details about what to do when an image that deviates from the reference image is detected in automatic inspection, refer to Troubleshooting.


 in the upper-right of a page, it turns into
  and is registered as a bookmark.