[User Mode] Screen
Overview
Check the status of the printer, scanner, and network in this system.
This item is displayed when you log in to Web Connection.
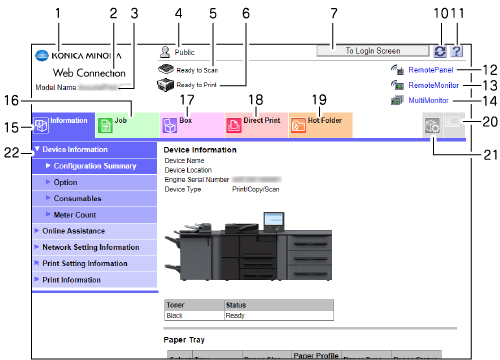
This section provides a description using the [Information] - [Device Information] screen as an example.
- The contents of Web Connection screen vary depending on the optional devices mounted on this system and the system settings.
- For details about the login procedure, refer to [Login].
Screen and Description
[Public User]

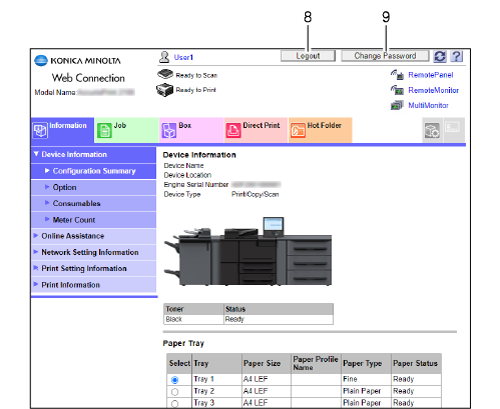
[Registered User]

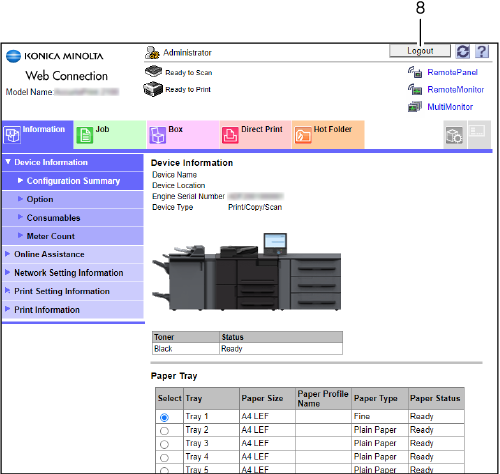
[Administrator]

No. | Item | Description |
|---|---|---|
1 | KONICA MINOLTA logo | Click this to access the Konica Minolta website. http://www.konicaminolta.com/ |
2 | Web Connection logo | Clicking this logo displays the version information and copyright screen. Clicking the Web Connection logo on the displayed screen accesses the following website. https://www.konicaminolta.com/selector/index.html |
3 | Model name | Displays the model name of the machine. |
4 | Login user name | Displays the mode icon and user name ([Public], [Administrator], registered user name, or account name) of the current login user. The mode icon varies depending on the user type. Clicking the user name displays the login user name. |
5 | Status display  | Displays the scanner status of this system using the icon and message. This item is available on the product equipped with a scanner. |
6 | Status display  | Displays the printer status of this system using the icon and message. If you click the icon when an error occurs, error information ([Consumables] screen or [Paper Tray] screen) is displayed, enabling you to confirm the status. |
7 | [To Login Screen] | Displayed when you are logging in as [Public User]. Clicking this button displays the [Logout] screen to allow you to log out from the current mode. After logging out, the [Login] screen is displayed, enabling you to log in to another mode. |
8 | [Logout] | Displayed when you are logging in as [Registered User] or [Administrator]. Clicking this button displays the [Logout] screen to allow you to log out from the current mode. After logging out, the [Login] screen is displayed, enabling you to log in to another mode. |
9 | [Change Password] | Displayed when you are logging in as [Registered User]. Clicking this button displays the [Change User Password] screen to allow you to change the password. For details, refer to [Change User Password]. |
10 | Refresh  | Refreshes the information displayed on the screen. |
11 | Manual  | Displays the online manual of Web Connection. You can check the settings and the contents of each item for the supported operating systems and browsers. The setting of [Admin Mode] is required to display the online manual. For details, refer to [Register Support Information]. |
12 | [RemotePanel] | Displays the Touch panel screen of this system on the browser. This function allows you to remotely operate this system via the browser of the computer. For details, refer to Remote Panel. |
13 | [RemoteMonitor] | Displays the Touch panel screen of this system on the browser. This function displays the status of this system, the contents of the Touch panel screen, and the job status as thumbnails on the browser, enabling remote monitoring. For details, refer to Remote Monitor (Remote Monitoring of This System). |
14 | [MultiMonitor] | Displays multiple [RemoteMonitor] items side by side, and collectively monitors the status of multiple machines. Clicking 1 [RemoteMonitor] allows you to operate the machine as the [RemotePanel] on the same browser. For details, refer to Multi Monitor (Remotely Monitoring Multiple Devices). |
15 | [Information] tab | Checks components, options, and setting information of this system, and prints the information list. For details, refer to [Information]. |
16 | [Job] tab | Displays the status of the active job on this system as well as the output history. For details, refer to [Job]. |
17 | [Box] | Checks or prints hold jobs, HDD jobs, and secure jobs. You can also create a folder or box. For details, refer to [Box]. |
18 | [Direct Print] | Directly sends files stored in the computer to this system and prints them. You can make prints without using the printer driver. For details, refer to [Direct Print]. |
19 | [Hot Folder] | Allows you to create, edit, or delete the hot folder in this system. For details, refer to [Hot Folder]. |
20 |
| Displays the menu list in user mode. This function allows you to quickly access the item you want to operate. For details, refer to [Main Menu]. |
21 |
| Sets the default screen displayed after logging in to user mode. For details, refer to [Customize]. |
22 | Menu | Displays information and settings for the selected tab. The displayed menu varies depending on which tab was selected. |
Procedure
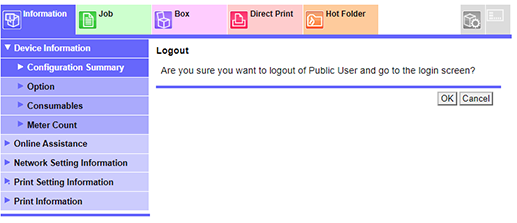
When you are logging in as [Public User]: [To Login Screen]
When you are logging in as [Registered User] or [Administrator]: [Logout]
The [Logout] screen is displayed.

Logout is completed, and the [Login] screen is displayed.


 ([Main Menu]) tab
 ([Customize]) tab
 in the upper-right of a page, it turns into
  and is registered as a bookmark.