[Schedule]
Overview
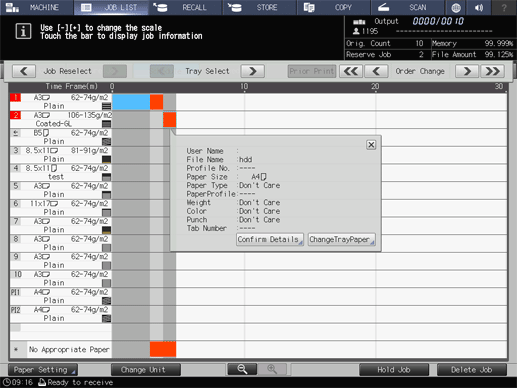
The status of [Reserved Job] is displayed in bar format.
It is possible to check the job processing status, change the printing order, and change a paper setting.
The job bar is displayed when the original has been loaded or the image input from Image Controller is completed.
The rest of the job being printed is represented by the length of the bar, which shortens over time. A job that finishes within 1 minute is displayed as 1 minute.
- The following setting is required to use this function.
- Set [Enhanced Security Mode] to [OFF].
When this system satisfies the following conditions, the [Schedule] screen will be redrawn.
- A Paper tray has been set or pulled out, or the amount of paper remaining has changed.
- The paper setting has been changed.
- A job has started or restarted.
- [Reserved Job] has been added or deleted, or the its output order has been changed.
- The job being printed has finished.
- The screen update interval of 30 seconds or more has occurred during printing.
- For details about [Enhanced Security Mode], refer to [Enhanced Security Mode].
- For details about [Reserved Job], refer to [Reserved Job].
Specifications
Category | Print Workflow | |||
Location | Machine | Touch Panel | ||
Printer driver | - | |||
Application | - | |||
Required options | - | |||
Required items | - | |||
Setting items | [Schedule] | The [Schedule] screen is displayed. | ||
Job bar display area | Displays the status of [Reserved Job] in the color bar. The color display rules are as follows: Blue: Output is possible, and there is a sufficient amount of paper. Yellow: The tray may run out of paper. Orange: There is a high possibility that the paper will run out during printing and that printing will stop, there is no applicable paper, or printing is not possible because the paper setting is different. When multiple Paper trays are used for one job, multiple bars are displayed. If there are multiple job bars, the background color is displayed separately for each job with shades of gray. | |||
Paper setting display | Displays the contents of the paper setting of the reserved job you selected. To close the screen, press [e] on the top right of the screen. | |||
[Confirm Details] | Displays the detailed paper setting of the reserved job you selected. | |||
[ChangeTrayPaper] | When the paper setting of the Paper tray used for printing is different from that of the [Reserved Job], change the Paper tray or change the paper setting of the Paper tray. For details, refer to [ChangeTrayPaper]. | |||
| Switches the paper setting display for each job when multiple job bars are displayed in the job bar display area.
| |||
| Press the key to switch the paper setting display for each target Paper tray when multiple Paper trays are used for the selected [Reserved Job].
| |||
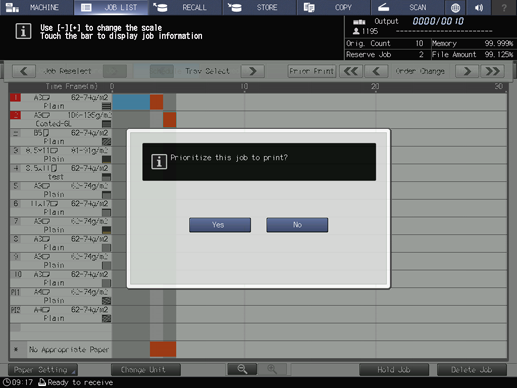
[Prior Print] | Preferentially prints the selected [Reserved Job]. | |||
| Changes the output order of [Reserved Job]. When the key is grayed out, the output order cannot be changed.
| |||
Work process axis item | One of the following items is displayed. Number of paper sheets used for job Scheduled start and end times for job operation Time required for job operation (minutes) The display unit can be changed. For details, refer to [Change Unit]. | |||
Paper tray item | Displays the following information of Paper tray. Paper size Remaining amount of paper Paper weight specified in paper setting Paper type | |||
No applicable paper | For a job for which the Paper tray used for printing is set to Auto, the job bar is displayed when there is no Paper tray that meets the conditions or when there is no paper in the Paper tray. | |||
[Paper Setting] | Change the paper setting of each Paper tray. For details, refer to [Change Set]. | |||
[Change Unit] | Changes the display unit of the work process axis item. For details, refer to [Change Unit]. | |||
| Changes the range that displays the unit axis in the job bar display area. For details, refer to [Change Unit]. | |||
[Hold Job] | Holds the selected job bar ([Reserved Job]). The job next to the currently printed job cannot be held. The held job is removed from the [Schedule] and displayed on the [Hold Job] screen. A job can also be held on the [Reserved Job] screen. For details, refer to [Reserved Job]. | |||
[Delete Job] | Deletes the selected job bar ([Reserved Job]). | |||
Remarks | - | |||
Reference | - | |||
Screen access | Touch panel - [JOB LIST] - [Schedule] | |||
Procedure (Changing the Output Order of the Selected [Reserved Job])

The [Order Change] key is displayed above the job bar display area.
When multiple paper trays are used for the job with the output order changed, press the [Tray Select] key to select one of the bars.

When any key of [Order Change] is grayed out, the output order cannot be changed in that direction.
The output order of reserved jobs can also be changed on the [Reserved Job] screen. For details, refer to [Reserved Job].
Procedure (Preferentially Outputting the Selected [Reserved Job])
The [Prior Print] is displayed above the job bar display area.
When multiple trays are used for the [Reserved Job] you want to preferentially output, press the [Tray Select] key to select one of the bars.

A confirmation dialog box is displayed.


 [Job Reselect]


 /
/
 in the upper-right of a page, it turns into
  and is registered as a bookmark.