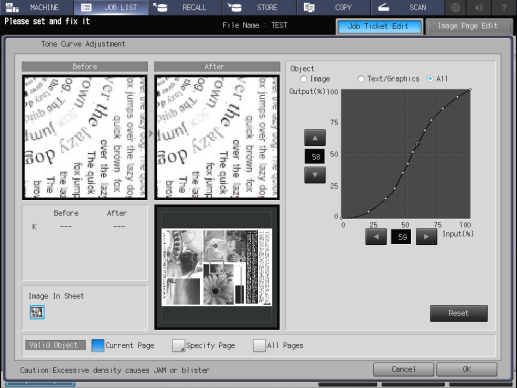
[Tone Curve Adj.]
Overview
Adjust the tone curve.
This function adjusts the entire brightness and contrast by adjusting the tone curve.
You can also adjust the tone curve for each tag ([Image] / [Text/Graphics]).
- This adjustment can also be done by connecting the mouse to this system and dragging the mouse. For details, refer to Mouse Operation.
- To adjust the tone curve for each tag, set [Tone Curve Each Tag Setting] to [Execute Each Tag Adj.]. For details, refer to [Tone Curve Each Tag Setting].
Specifications
Category | Print Workflow, Copy / Scan | |||
Location | Machine | Touch Panel | ||
Printer driver | - | |||
Application | - | |||
Required options | - | |||
Required items | - | |||
Setting items | Preview screen | [Before] | Displays an image on the preview screen before tone curve adjustment. | |
[After] | Displays an image on the preview screen after tone curve adjustment. The preview is displayed on the assumption that [Object] is set to [All]. | |||
[Before] / [After] | Displays the unadjusted and adjusted K values of the selected part on the preview image. | |||
[Image In Sheet] | For the combined image page data such as 2 in 1, each combined image is displayed. The selected image is displayed on the preview screen. | |||
Thumbnail screen | Displays the overall view of an image page. | |||
[Object] | Set the target to adjust the tone curve. [Image] [Text/Graphics] [All] | |||
Tone Curve Adjustment Screen | Displays a tone curve. Adjustment is made by moving the position of the tone curve adjustment point (-). | |||
[Output(%)] | Displays the output density (%). | |||
[Input(%)] | Displays the input density (%). | |||
[Reset] | Resets all the adjustment values. | |||
Remarks | - | |||
Reference | - | |||
Screen access | Touch panel - [JOB LIST] - [Hold Job] - [Job Ticket] - [Job Ticket Edit] - [Tone Curve Adj.] | |||
Touch panel - [JOB LIST] - [Hold Job] - [Page Edit] - [Job Ticket Edit] - [Tone Curve Adj.] | ||||
Touch panel - [JOB LIST] - [Secure Job] - [Job Ticket] - [Job Ticket Edit] - [Tone Curve Adj.] | ||||
Touch panel - [JOB LIST] - [Secure Job] - [Page Edit] - [Job Ticket Edit] - [Tone Curve Adj.] | ||||
Procedure
When [Do Not Execute Adjustment] is selected in [Tone Curve Each Tag Setting], [Object] is not displayed.

The adjustment point (-) is created by pressing the desired point on the tone curve.
Press [+]/[,] or [*]/[)] of [Input(%)] or [Output(%)] on the Tone Curve Adjustment screen, and set the adjustment point position.
Up to 17 adjustment points can be created on a tone curve (including 2 points of input 0% and 100%).
The selected adjustment point is targeted for the adjustment and displayed as a black circle (-). Other adjustment points are displayed as a white circle (.).
To undo the adjusted tone curve, press [Reset].

If a specific part is selected on a thumbnail, it is displayed by a blue frame and enlarged in [Before] and [After] on the preview screen.
When the mouse is connected to the system, if you click on the preview image in [Before] or [After], the parts corresponding to the K value at that position are displayed as a black circle on the tone curve. This is useful when you want to change the tone curve of a specific part on a preview image.
For details, refer to [Valid Object].

 in the upper-right of a page, it turns into
  and is registered as a bookmark.