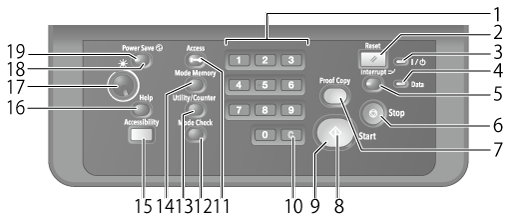

Control panel of This System
Overview
The Control panel has keys and LED lamps arranged to operate this system or set functions.
Each key is assigned to a function, and each LED lamp indicates the status of this system.
Names and Descriptions

No. | Key name | Description |
|---|---|---|
1 | Keypad | Used to enter numeric values. |
2 | Reset | Clears the job conditions, which are set on the [COPY] screen, [SCAN] screen, or [STORE] screen, and returns to arbitrary settings. However, the following processing is performed on the [SCAN] screen. When Reset is pressed on the [SCAN] screen: all the selected destinations are cleared; however, the conditions specified on the [Scan Settings] screen do not return to arbitrary settings. When Reset is pressed on the [Scan Settings] screen: the specified conditions return to arbitrary settings; however, the destinations selected on the [SCAN] screen are not cleared. Arbitrary settings can be selected from [Initialize] or [Full Auto]. [Full Auto] is selected by default. For details about how to select arbitrary settings, refer to [Reset Button Function]. |
3 | Power LED | Lights up orange when the Main power switch is turned on, and turns blue when the Sub power switch is turned on. |
4 | Data LED | Flashes while the system is receiving print data. |
5 | Interrupt | Interrupts the currently running operation to give priority to copy processing when you attempt to make a copy for another project during copying, printing, or scan processing. The Interrupt LED lamp flashes until the system is ready for the Interrupt mode. When the system is ready for the Interrupt mode, the Interrupt LED lamp remains lit. For details about the operation method, refer to [Copy / Scan]. |
6 | Stop | Temporarily stops printing or interrupts operation of this system. |
7 | Proof Copy | Allows you to check the finishing by scanning the original and printing only a single copy or only the 1st page when specifying multiple copies for copy processing. For details about the operation method, refer to [Copy / Scan]. For details about how to set whether to print 1 copy of all pages or only the 1st page, refer to [[Proof Copy] 1 Set/1st Sheet Selection]. On [Quality Adj.] on the [COPY] screen, you can also check the finishing by pressing [Adj.Proof Copy] on the Touch panel. You can print and check the contents you edited in [Job Ticket Edit] or [Image Page Edit]. Also, you can check the edited contents by pressing [Sample Output] on the Edit screen. For details, refer to [Sample Output] (for [Job Ticket Edit]) or [Sample Output] (for [Image Page Edit]). |
8 | Start | Starts each function. |
9 | Start LED | Lights up blue when the system is ready to operate. This LED lamp turns orange if no operation can be started. |
10 | C | Clears the entered numeric value. |
11 | Access | When this key is pressed while an operation is performed with user authentication or account track enabled, the operation is interrupted. When user authentication or account track is required, the authentication screen is displayed, and this system is not available until authentication is performed again. |
12 | Mode Check | Used to check the contents of the active or set print job. |
13 | Utility/Counter | |
14 | Mode Memory | Registers any job conditions or recalls the registered job conditions. If necessary, you can recall the previous job conditions. For details about Mode Memory, refer to Mode Memory. |
15 | Accessibility | Adjusts the response time when a key on the Touch panel or Control panel is pressed. For details about how to set the key response time, refer to [Key Response Time]. |
16 | Help | Displays the help message of the displayed screen. Depending on the screen, " |
17 | Brightness adjustment dial | Adjusts the brightness of the Touch panel. |
18 | Power Save | Activates or deactivates the power-saving mode. For details about the power-saving function, refer to [Power Save Function Setting]. |
19 | Power Save LED | Lights up when a power-saving mode such as shut-off or low power is activated, or when this system is turned OFF because the Weekly Timer is active. For details about the power-saving function, refer to [Power Save Function Setting]. For details about the Weekly Timer, refer to [Weekly Timer Setting]. |
 " may become inactive, which will stop any help messages from being displayed.
 in the upper-right of a page, it turns into
  and is registered as a bookmark.