Max. Density Auto Adj.
The Maximum Density Auto Adjustment is :
When Intelligent Quality Optimizer IQ-501 is mounted on the machine, automatic adjustment is made using Intelligent Quality Optimizer IQ-501.
When Intelligent Quality Optimizer IQ-501 is not mounted on the machine, make adjustments using Relay Unit RU-511.
This section describes how to make adjustments using Relay Unit RU-511 when the Intelligent Quality Optimizer IQ-501 is not mounted on the machine.
Automatically adjust the maximum density for each of Y, M, C, and K colors by scanning printed charts with the color sensor density mounted on Relay Unit RU-511.
NOTICE
To activate this function, you need to ask a service engineer in advance to set up the desired maximum density value (desired density). For details, contact your service representative.
Be sure to use the paper for registering a desired density to perform Max. Density Auto Adj.. With an unregistered paper, the adjustment cannot be performed correctly.
If you want to perform automatic adjustment using paper other than a registered paper, you need to register a desired density again. For details, contact your service representative.
When this adjustment is conducted, proceed to the calibration with the Image controller.
Be sure to perform Color Density Manual Control after changing the maximum density.
Tips
After Max. Density Auto Adj., the paper profile used for automatic adjustment changes to the one used for registering a desired density; the profile does not return to the one before adjustment. You can ask a service engineer to specify the setting so that after this adjustment the paper profile automatically returns to the one before adjustment. For details, contact your service representative.
Max. Density Auto Adj. (RU) is displayed instead when Intelligent Quality Optimizer IQ-501 is not mounted on the machine.
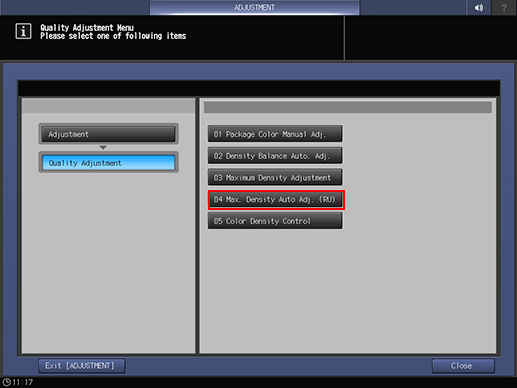
Press Adjustment on the MACHINE screen to display the Adjustment Menu screen.
Press Quality Adjustment and Max. Density Auto Adj. (RU) in sequence.

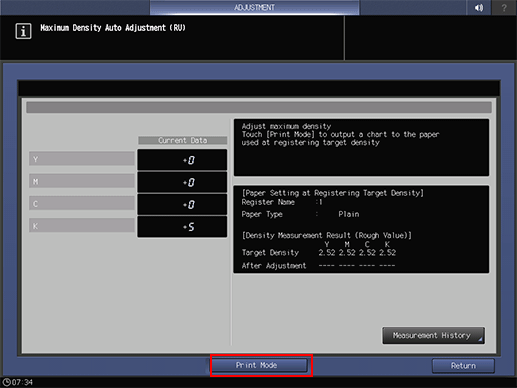
Press Print Mode.

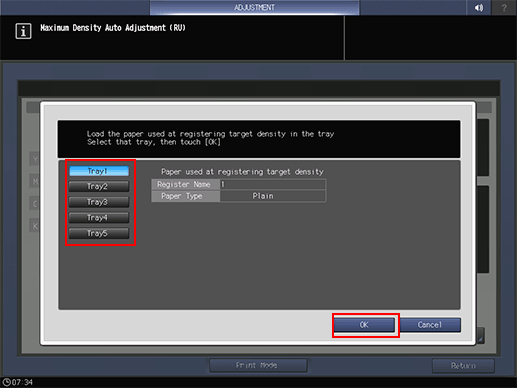
Load paper used to register a desired density in a tray
The paper profile for the tray automatically changes to the one used for registering a desired density.
Select the tray in which you load paper, and then press OK.

Press Start on the control panel.
A chart applied the Screen 1 (Dot190 Recommended) is Output.
The charts are measured using the density sensor of Relay Unit RU-511 and delivered into the output tray.
supplementary explanationYou cannot stop the adjustment until all charts are completely printed.
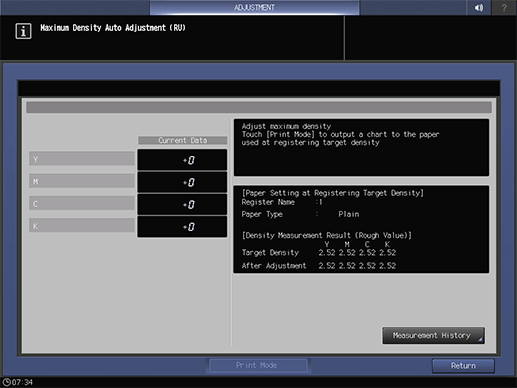
After the adjustment is completed, the screen returns to the Maximum Density Auto Adjustment (RU) screen.
The measurement result will be displayed on After Adjustment.

The result of automatic adjustment is displayed under Current Data. These values are reflected on [Maximum Density Adjustment].
supplementary explanationPress Measurement History to view the measurement history (up to 30 results).
supplementary explanationPress Switch Display on the Maximum Density Measurement History screen to change the items in the history list. (Display 1: Measurement Date and Measured Value for each color, Display 2: Paper Type and Set Value for each color.)
Press Return to return to the Quality Adjustment Menu screen.
Note that the paper profile for the tray remains in the one used for registering a desired density.
supplementary explanationTo perform the fine adjustment after checking the result of automatic adjustment, manually adjust each item in Maximum Density Adjustment above.