
[Advanced Options] Window
You can set the printer's advanced functions.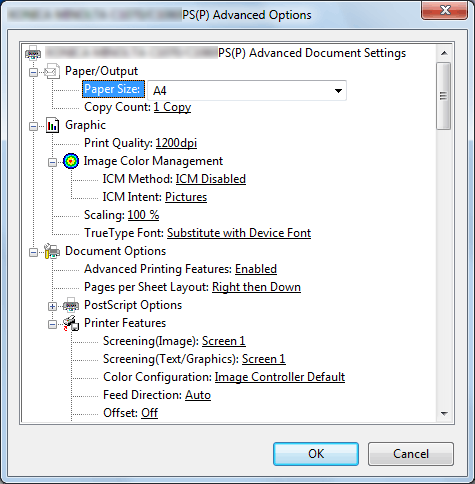
Function | Option | Description |
|---|---|---|
[Paper Size] | All paper sizes available in this machine | Set a paper size. |
[Print Quality] | [600dpi], [1200dpi] | Set a resolution. |
[ICM Method] | [ICM Disabled], [ICM Handled by Host System], [ICM Handle by Printer], [ICM Handle by Printer using printer calibration] | Set an ICM method. |
[ICM Intent] | [Graphics], [Pictures], [Proof], [Match] | Set the intent of ICM. |
[Scaling] | 1 to 1000% | Set an enlarge or reduce ratio. |
[TrueType Font] | [Substitute with Device Font], [Download as Softfont] | Set an output method of a TrueType font. |
[Advanced Printing Features] | [Enabled], [Disabled] | Set this to enable the [Pages per Sheet Layout] function. |
[Pages per Sheet Layout] | [Right then Down], [Down then Right], [Left then Down], [Down then Left] | Set this to enable the [Pages per Sheet Layout] function. |
[PostScript Options] | [Optimize for Speed], [Optimize for Portability], [Encapsulated PostScript (EPS)], [Archive Format] | Set an output option for PostScript. For details, refer to the PostScript guide. |
[TrueType Font Download Option] | [Automatic], [Outline], [Bitmap], [Native TrueType] | Set an download option for a TrueType font. |
[PostScript Language Level] | 1 to 3 | Set a PostScript language level. |
[Send PostScript Error Handler] | [Yes], [No] | Set whether to send a PostScript error handler or not. |
[Mirrored Output] | [Yes], [No] | Set [Mirrored Output]. |
[Screening (Image)] | [Screen 1], [Screen 2], [Stochastic] | Select a screen group to be set for image objects. The selected screen group is assigned with the screen type specified in the [Quality Adjustment]* on the touch panel of the main body. You may note that the image reproducibility varies depending on the screen. Select a screen suitable for the required image quality.
|
[Screening (Text/Graphics)] | [Screen 1], [Screen 2], [Same as Screening (Image)] | Select a screen group to be set for text and graphic objects. The selected screen group is assigned with the screen type specified in the [Quality Adjustment]* on the touch panel of the main body. You may note that the text and graphic reproducibility varies depending on the screen. Select a screen suitable for the required image quality.
|
[Color Configuration] | [No Setting], [Image Controller Default] | Set whether to use the color configuration in the image controller or not. |
[Feed Direction] | [Auto], [Long Edge], [Short Edge] | Set a direction to feed paper. |
[Offset] | [Off], [On] | Stagger after each set of copies specified. |
[Print Position Setting] | [Off], [Left], [Center], [Right] | Set the print position. |
[Weight] | [No Setting], [55-61]g/m2, [62-74]g/m2, [75-80]g/m2, [81-91]g/m2, [92-105]g/m2, [106-135]g/m2, [136-176]g/m2, [177-216]g/m2, [217-256]g/m2, [257-300]g/m2, [301-350]g/m2, (When the weight unit is g/m2) | Set weight of print paper. |
[Color] | [White], [Blue], [Goldenrod], [Gray], [Green], [Ivory], [Orange], [Pink], [Red], [Yellow], [Cream], [Others], [User Color] | Set the color of print paper. |
[Pre-Punched] | [Off], [On] | Set this to print on pre-punched paper. |
[Output Tray] | [Default], [Stapler Main Tray], [Stapler Sub Tray], [Stacker Auto], [Stacker 1 Main Tray], [Stacker 1 Sub Tray], [Stacker 2 Main Tray], [Stacker 2 Sub Tray], [Saddle-Stitcher Sub Tray], [Multi Folder Main Tray], [Multi Folder Sub Tray], [Perfect Binder Sub Tray] | Select an output tray. |
[Face Up] | [Off], [On] | Set this to output printed paper with its face up. |
[N to 1] | [Off], [On] | Set this to print an original in a reverse order. |
[Pile Permission] | [Off], [On] | With [On] selected, other jobs can be printed and are permitted to pile up on the large capacity stacker. With [Off] selected, the next job cannot be printed until the current job is removed from the large capacity stacker. |
[Binding Position] | [Left Bind], [Top Bind], [Right Bind], [Left Bind (Landscape)], [Top Bind (Landscape)], [Right Bind (Landscape)] | Set a position to bind when using a function such as [Staple] and [Punch]. |
[Print Type] | [1-Sided], [2-Sided] | Set whether to print in 2-sided mode. |
[Imposition] | [Off], [Booklet], [Adhesive Binding], [2 in 1], [2 Repeat], [2 Repeat Reversal (Left)], [2 Repeat Reversal (Right)], [2 Repeat Reversal (Top)], [2 Repeat Reversal (Bottom)], [4 Repeat] | Set this to perform an imposition printing. |
[Book Spread] | [Off], [On] | Set this to perform book spread printing from mixed sized originals in the case of Booklet or Adhesive Binding. |
[Staple] | [Off], [Left Corner], [Right Corner], [2 Positions (Wide)], [2 Positions (Narrow)], [2 Positions (Narrow+)] | Set this when stapling. |
[Punch] | [Off], [2-Hole], [3-Hole], [4-Hole], [Multi Punch] | Set this to punch paper. |
[Fold] | [Off], [Z-Fold], [Fold and Staple], [Fold & Staple + Trim], [Half-Fold - Inside], [Half-Fold - Outside], [Tri-Fold - Inside], [Tri-Fold - Outside], [Tri-Fold - Out - Inside], [Tri-Fold-Out - Outside], [Double Parallel-Fold - Inside], [Double Parallel-Fold - Outside], [Gate-Fold - Inside], [Gate-Fold - Outside], [Multi Tri-Fold - Inside], [Multi Tri-Fold - Outside], [Multi-Half-Fold - Inside], [Multi-Half-Fold - Inside + Trim], [Multi-Half-Fold - Outside], [Multi-Half-Fold - Trim] | Set the fold function. [Fold and Staple] and [Fold & Staple + Trim] are provided with [2 Positions] and [4 Positions] as options for each. |
[180° Rotate] | [Off], [On] | Select On to rotate the document 180° to print. |
[Front Cover] | [Off], [Print], [Blank] | Set this to add a front cover. |
[Front Cover Tray] | [Off], [Tray 1] to [Tray 9] | Select a tray for a front cover. |
[Back Cover] | [Off], [Print], [Blank] | Set this to add a back cover. |
[Back Cover Tray] | [Off], [Tray 1] to [Tray 9] | Select a tray for a front cover. |
[PI Front Cover Tray] | [Off], [PI Tray 1] to [PI Tray 2] | Set this to print a front cover on paper that is different with the output paper, such as thick paper. |
[PI Back Cover Tray] | [Off], [PI Tray 1] to [PI Tray 2] | Set this to print a back cover on paper that is different with the output paper, such as thick paper. |
[Perfect Binding Setting] | [Off], [Cover Blank], [Cover Print 1in1], [Cover Print 2in1], [Cover Print 3in1] | Select a cover tray for a perfect binder. |
[Perfect Binding Cover Tray] | [Off], [Tray 1] to [Tray 9], [PI Tray 1], [PI Tray 2], [PB Cover Tray] | Select a cover tray for a perfect binder. |
[Perfect Binding Cover Duplex] | [Off], [On] | Set this when printing a 2-sided cover for a perfect binder. |
[Perfect Binding Cover Trim] | [Off], [On] | Set this when trimming a cover for a perfect binder. |
[Ring Binding] | [Off], [On] | Set this to bind the printed paper using ring-shaped binder. |
[Printed Side for Top Sheet] | [Outside Print], [Inside Print] | Specify the printed side of the top sheet when the [Ring Binding] is set. |
[Printed Side for Last Sheet] | [Inside Print], [Outside Print] | Specify the printed side of the last sheet when the [Ring Binding] is set. |
[Print Mode] | [Print], [Spool], [Hold], [Print and Hold] | Set a print method. When [Normal Print] is selected, the print job is printed without it being saved in an HDD. When [Spool] is selected, the print job is saved in the HDD in the machine temporarily, and then printed. It can prevent the intermittent printing that may be observed when printing jobs with a lot of pictures, etc. For details about [Save] and [Save/Print], refer to Saving a Print Job to HDD (PS Plug-in Driver). |
[Output Color] | [Auto Color], [Full Color], [Gray Scale] | Set the output color. When selecting [Auto Color], image controller sets the output color automatically. |
[Smoothing] | [Off], [On] | With [On] selected, you can smoothly print the outline of text with density of 100%, such as K=100%, and line images. The smoothing function is applied only to the part of primary colors (C, M, Y, or K). It is not applied to the area with mixed colors. |
[Thinning] | [Off], [On] | Select this check box to set thinning. It can prevent a small character becoming unreadable. |
[Emphasis] | [Off], [On] | Set this to enable the outline emphasizing function. |
[Auto Trapping] | [Off], [On] | With [On] selected, white spaces generated due to misregistration can be reduced. |
[Color Text Blur Prevention] | [Off], [On] | With [On] selected, the toner quantity of color text is controlled to reduce toner scattering. |
[Outline Settings] | [Off], [Text/Graphics], [Text/Graphics/Image] | The outline of text in gray and figures are printed sharply. |
[1 Dot Line Emphasis] | [Off], [On] | Select this check box to emphasis an ultrafine line. |
[Toner Save Mode] | [Off], [Weak], [Middle], [Strong] | Set this when using the toner save function. |
[Separation Output] | [Off], [On] | Print cyan, magenta, yellow, and black separately for each proof. |
[Use CIE Color] | [Off], [On] | Select this check box to use a CIE color space at printing in gray scale. When [On] is selected for [Use CIE Color], the printing is processed via the color space defined by CIE, an international commission on illumination. Although the quality in reproducing the gradation will be better than usual, it may require more time to print. |
[Rendering (Text)] | [Perceptual], [Saturation] | Set this to configure rendering of a text. |
[Rendering (Graphics)] | [Perceptual], [Saturation] | Set this to configure rendering of a graphic. |
[Rendering (Image)] | [Perceptual], [Saturation] | Set this to configure rendering of an image. |
[Paper Simulation] | [Off], [On] | Set this to configure Paper Simulation. |
[Printer Profile] | [No Setting], [Paper Type Link] | Set this to configure a printer profile. Select [Paper Type Link] to apply a profile that is appropriate for the paper type. |
[Pure Black] | [Off], [Text], [Text/Graphics] | Set this to print a black region only with a black toner. |
[Gray Replacement (RGB)] | [Off], [Text/Graphics], [Text/Graphics/Image] | Set this to print a gray region only with a black toner. |
[Gray Replacement (CMYK)] | [Off], [Text/Graphics], [Text/Graphics/Image] | Set this to print a gray region only with a black toner. |
[Black Overprint] | [Off], [On] | Set this to prevent white space being generated around an object by overprinting it. |
[Spot Color] | [Off], [On] | Print spot color that is set in an application in adjusted CMYK values. |
[Alternative Color] | [Off], [On] | Convert color to the other color based on the setting defined in the image controller. |
[Composite Overprint] | [Off], [High Speed], [High Quality] | Overprint an object that is set to be overprinted in an application. |
[Date/Time] | [Off], [All Pages], [1st Page Only] | Set this to print date/time. |
[Font] | Gothic 8, 10, 12, 14 pt Ming 8, 10, 12, 14 pt | Set the font to print [Date/Time]. |
[Position] | [Top Left], [Left], [Bottom Left], [Top], [Center], [Bottom], [Top Right], [Right], [Bottom Right] | Set the position to print [Date/Time]. |
[Date] | ['10/11/23], [Nov 23,2010], [11/23/'10], [23 Nov,2010], [23/11/'10] | Set a notation for [Date]. |
[Time] | [Off], [1:23PM], [13:23] | Set a notation for [Time]. |
[Color] | [Black], [Red], [Green], [Blue], [Yellow], [Magenta], [Cyan] | Set the text color for [Date/Time]. |
[Color Bar] | [Off], [Left], [Top], [Right], [Bottom], [Image Controller Default] | Set a print position for [Color Bar]. |
[Color Settings Information] | [Off], [Left], [Top], [Right], [Bottom], [Image Controller Default] | Set the print position for [Color Settings Information]. |
[Number of Lines] | 1 to 5 | Set the number of lines for [Color Settings Information]. |
[Printed Items - Date/Time] | [Off], [On] | Select this check box to print [Date/Time] for [Color Settings Information]. |
[Printed Items - Job Name] | [Off], [On] | Select this check box to print [Job Name] for [Color Settings Information]. |
[Printed Items - User Name] | [Off], [On] | Select this check box to print [User Name] for [Color Settings Information]. |
[Printed Items - Calibration Date/Time] | [Off], [On] | Select this check box to print [Calibration Date/Time] for [Color Settings Information]. |
[Printed Items -Printer Name/Model Name] | [Off], [On] | Select this check box to print [Printer Name/Model Name] for [Color Settings Information]. |
[Printed Items - ROM Version] | [Off], [On] | Select this check box to print [ROM Version] for [Color Settings Information]. |
[Printed Items - RGB Color Conversion] | [Off], [On] | Select this check box to print [RGB Color Conversion] for [Color Settings Information]. |
[Printed Items - CMYK Color Conversion] | [Off], [On] | Select this check box to print [CMYK Color Conversion] for [Color Settings Information]. |
[Printed Items - Tone Curve Name] | [Off], [On] | Select this check box to print [Tone Curve Name] for [Color Settings Information]. |
[Printed Items - Spot Color] | [Off], [On] | Select this check box to print [Spot Color] for [Color Settings Information]. |
[Printed Items - Alternative Color] | [Off], [On] | Select this check box to print [Alternative Color] for [Color Settings Information]. |
[Printed Items - Composite Overprint] | [Off], [On] | Select this check box to print [Composite Overprint] for [Color Settings Information]. |
[Printed Items - Black Treatment] | [Off], [On] | Set this to print [Black Treatment] for [Color Settings Information]. |
[Printed Items - Screening] | [Off], [On] | Select this check box to print [Screening] for [Color Settings Information]. |
[Printed Items - Toner Save Mode] | [Off], [On] | Set this to print [Toner Save Mode] for [Color Settings Information]. |
[Printed Items - Comment] | [Off], [On] | A comment can be printed for up to 200 characters in [Color Settings Information]. |
*[Quality Adjustment] can be set from Utility Menu by selecting [Administrator Setting] - [System Setting] - [Expert Adjustment] - [Quality Adjustment] - [Custom Screen].

The [Staple] function is available only when an optional stapler is mounted.
You can select the width between 2 Positions only when a stapler (Finisher FS-532) is mounted.
The widths between 2 Positions that can be set are as follows:
Wide...Approx. 165 mm / 6.50"
Relatively narrow...Approx. 140 mm / 5.51"
Narrow...Approx. 120 mm / 4.72"The [Punch] function is available only when an optional Punch Kit, Multi Folder, or Multi Hole Punch Unit is mounted.
The [Fold] function is available only when the optional Multi Folder, Stapler, and Saddle Kit are mounted.
The [Ring Binding] function is available only when an optional Ring Binder is mounted.
When [Printed Items - Comment] is turned [on], it will print the comment that is configurable in [Color Default Settings] in "Color Centro". For details, refer to Specify Information to Print.

For details about the paper sizes that can be loaded in the tray, refer to Paper Size Available for Use.