Common Setting: Setting the Various Operations of the Machine
The following features can be provided by switching the selection.
Menu item | Description | Setting options (with default bolded) |
|---|---|---|
[One Shot Message Indication Time] | Select the time span to display a shot message, such as [Original size is A4], in the message area of the touch panel. | 3 seconds, 5 seconds |
[Offset by Job Unit] | Specify whether or not to offset the output sheets by job. | ON, OFF Also specify the number of jobs to be offset when selecting ON for this function (default: 1). |
[Continuation Print] | Specify whether or not to output multiple reserve jobs in succession without stopping the machine at a job break. | Copy ON, Copy OFF, Printer ON, Printer OFF |
[Dark Tone Control] | In order to adjust the quality of output image, select whether to automatically decrease the copying speed (Quality), prioritize the copying speed, or disable the control over the tone. | OFF, Quality, Performance |
[Icon Display for Dark Tone Control] | Select whether or not to display the Dark Tone icon while the Dark Tone Control function is enabled. This function is available only when [Quality] or [Performance] is selected at [Dark Tone Control]. | ON, OFF |
[Dash Length (Page Stamp)] | Select the length of the dash to be used in a style of [Page No.] in [Stamp]. | Long, Short |
[Center Crop Mark Trim Margin] | Specify the space between the center crop mark and image area (center crop mark trim margin). | 0.0 mm to 20.0 mm (Default: 1.0) |
[Schedule Cross Axis Unit (Default)] | Select the unit of horizontal axis on the [Schedule] screen. | Timetable, Time Frame (m), Sheet Volume |
[Hold Job Status after Output (Default)] | Select the default value to delete or save the data of hold job after outputting. | Delete, Save |
[Offset Output Mode] | Specify how to offset the output sets. | Change Out Pos., Change Out Position + Partition Paper (Tray 1 to Tray 5, Bypass, PI 1, PI 2), Partition Paper Insertion (Tray 1 to Tray 5, Bypass, PI 1, PI2), Stop Print |
[Needless Tab Paper Exit] | Specify whether or not to automatically discharge the oddments of tabbed sheets loaded in a tray as a set for copy job. | ON, OFF |
[Remaining Memory (Measurement Unit)] | Select the unit of displaying the remaining memory. | %, GB |
[Remaining Memory (Warning)] | Select the percentage at which to give warning when the remaining memory is low. | 5 % or Less, 10% or Less |
[[Proof Copy] 1 Set/1st Sheet Selection] | If it is turned ON, the confirmation window is opened and you are asked to output one confirmation copy or to output only its first page when the [Proof Copy] is pressed. | ON, OFF |
[Temp. Down/Up Control before Print] | Select whether to rotate the fusing roller before printing starts, in order to print at the appropriate temperature. | ON, OFF |
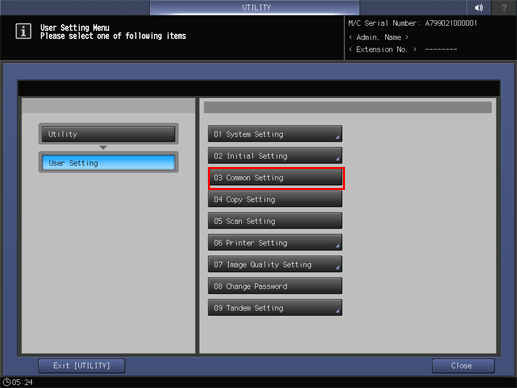
Follow the procedure on User Setting to display the [User Setting Menu] screen.
Press [Common Setting] on the [User Setting Menu] screen.

Press one option for each item.
This setting screen has 5 pages to go through. Use [Next] or [Previous] to scroll.
Selecting [ON] for [Offset by Job Unit] displays the [Offset by Job Unit] screen. Use the touch panel keypad to specify the number of jobs to be offset, then press [OK]. Available range is from 1 to 9,999.
Press [OK] to complete the setting.
To cancel the change, press [Cancel].
In either case, the screen returns to the [User Setting Menu] screen.
